
When it comes to walking or hiking, we often focus on the big things—boots, shoes, comfortable clothing, hydration, and the correct poles. But it’s often the smallest details that can trip us up—literally. Recently, one of our members experienced a fall when her walking pole caught in a loosely tied shoelace. This incident serves as an important reminder: properly tied shoelaces are not just about comfort; they’re a crucial safety measure.
In this blog, we’ll cover some effective ways to tie your shoelaces securely, reducing the risk of trips, falls, and injuries.
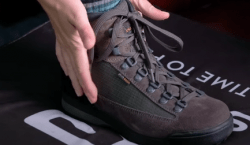
Why Proper Shoelace Tying Matters
- Prevents Trips and Falls: Loose laces can easily get caught on walking poles, rocks, or roots.
- Maintains Foot Support: Properly tied laces keep your foot snug in the shoe, reducing the risk of blisters, ankle twists, and discomfort.
- Improves Stability: A secure fit enhances your balance, especially on uneven terrain.Common Shoelace Mistakes
- Loose Knots: A quick, loose bow might save time, but it can unravel easily.
- Long Loops or Dangling Ends: These create tripping hazards and can snag on equipment.
Worn-Out Laces: Frayed or stretched laces don’t hold knots as effectively.
Tying Techniques for Safety and Security
The “Lock Lacing” Technique (Great for Hiking Boots)
Lock lacing helps keep your heel firmly in place, reducing friction and preventing your foot from sliding:
- Lace your boots as usual until the second-to-last eyelets.
- Instead of crossing the laces, thread each lace straight up into the final eyelet on the same side, creating a loop.
- Cross the laces over and tuck them into the loops you’ve just created.
- Pull tight to “lock” your heel in place, then tie your knot as normal.
The “Ian Knot” – The Fastest Secure Shoelace Knot
This knot is quick to tie and stays secure:
- Make a loop with each lace end simultaneously.
- Cross the loops over each other.
- Tuck each loop through the hole created by the crossover.
- Pull tight.
The Ultimate Shoelace Knot.
Popularised by the luxury brand Berluti, this knot combines elegance with exceptional hold:
- Start with a standard criss-cross tie.
- Make a loop with each lace.
- Cross the loops over twice instead of once (adding extra friction).
- Pull the loops tight to secure the knot.
Why It’s Great for the Hills:
- Exceptional Hold: The double twist prevents slippage during long hikes.
- Easy to Untie: Releases easily with a simple tug, even when wearing gloves.
- Reduces Tripping Hazards: Holds its shape well, keeping loose ends tidy and secure.
The Standard “Surgeon’s Knot” (Double Knot)
This simple technique adds an extra twist to the basic knot, making it less likely to come undone:
- Tie your shoelace as you normally would.
- Before pulling the loops tight, twist one loop around the other twice instead of once.
- Pull firmly to secure.
- Tucking in Loose Ends
After tying your laces, tuck the loops and ends under the crisscrossed laces along the top of your foot. This simple trick keeps them from dangling and getting caught.
Quick Tips for Shoelace Safety:
- Double-check your laces before starting any walk or hike.
- Replace worn-out laces regularly.
- Practice secure knots until they become second nature.
- If your laces come undone frequently, consider swapping them for flat, textured, or elastic laces, which hold knots better.
Final Thoughts
While it may seem like a small detail, taking an extra moment to secure your shoelaces properly can prevent accidents and injuries. Whether you’re tackling rugged trails or strolling through the park, make shoelace safety part of your routine—your feet will thank you!
Do you have a favourite lacing technique or safety tip? Share it in the comments—we’d love to hear from you!